Prerequisite: Basic
understating of ABAP Webdynpro component, views, windows.
If you have the basic understanding of ABAP WD and have
created few WD applications on your own, I am sure Floor plan manager (FPM)
would be in your next hit list. So I’ll start with what is FPM, what it’s use
is, what are the different options available under FPM and then at last we will
create one application using one of those options.
In simple words FPM is a kind of wrapper we use above our WD
application so that the application look uniform in UI and bear a consistency
throughout the application. FPM can be
of different types. Below are listed available types.
Object Instance Floorplan (OIF): Standard component is FPM_OIF_COMPONENT
Overview Page Floorplan (OVP): Standard component is FPM_OVP_COMPONENT
Guided Activity Floorplan (GAF): Standard component is FPM_GAF_COMPONENT
Guided Activity Floorplan (GAF): Standard component is FPM_GAF_COMPONENT
Quick Activity Floorplan (QAF): This is kind of subset of
OIF so standard component will be same
Below mentioned are the rough steps which we follow while
creating the FPM application.
- Till creation of WD component our work will remain same. The only difference is at component level, we have to implement the WD component interface named IF_FPM_UI_BUILDING_BLOCK.
- After that while creating the application we give the respective standard component’s name in component field and corresponding interface view and plug name also.
- We create configuration of the WD application, which will lead us to a web page of Webdynpro ABAP Application Configuration. At this point of time it’s very crucial to understand the concept of Application Configuration and Component Configuration. As the name suggests application configuration is meant for WD application and component configuration is meant for WD component. What is the basic difference between these two, we will cover in a later post. As of now we have to create an application configuration for the WD application. We have to give a configuration id for this application configuration. Once we create this configuration id we will see a screen which tells us about the component which we have given while creating the WD application. And now for this component we have to create a component configuration, where we can give the different view of different WD component we would like to have in different tabs. It may sound all clutter up, but have patience. It’s just a matter of doing a practical.
So we will create one WD application with 4 views, 2
windows where each window will host the 2 view out of 4 and we will create
plugs so that we can come back and forth with a window’s view. Now we will make
a FPM application. For simplicity, we will only have one text displayed in each
view. In Implemented Interface tab we
will re-implement the component named IF_FPM_UI_BUILDING_BLOCK.

Create a WD
application. As soon as window for application comes, it automatically has the
component name for which we are creating the application in component field. We
have to remove it and give entries like in screen shot.


Go to the application, right click on it and choose
the below path.

A web page will get opened like below and it will
have the application name. Beside is the field where we have to give the
application configuration id. You can see this page is meant for application
configuration. If we create component configuration the title of the page will
read component configuration instead of application configuration. Give the
name for configuration id.

Click on create.

Once you click OK below screen will come. First
column will tell us the WD application name. Second column will give us the
name of the component which we have given in component field while creating the
application. Had we not changed it to FPM_OIF_COMPONENT, it would have come as
our component name. The last column is blank which is where we have to put the
Component configuration name, and guess what. This component configuration
would be for which component. This would not be for our component but for FPM_OIF_COMPONENT.
So we will give a name there.

And as soon as we will save it “Go To Component
Configuration” button will get active.

A warning is coming. Let it come, we care only about
errors :).
So click on newly activated button. IT
will take you to the Component configuration screen, and you can clearly see
for which component we are creating the configuration. Click on create.


Once you click on OK,
below screen will come which will actually be the layout when will test our
application. So we have to now design this screen as per our requirement.
One main view and
inside that one sub view comes by default. Inside that sub view one UIBB will
come, which will actually host the windows of the component. We can see that
when we click on UIBB, we get fields to gibve the name of the component and the
view name. This view here in UIBB is actually the window in WD component. If
you give the component name and do F4 in view field, you will get all the
windows which are there in WD component. In right side you have buttons to add many
more main views, sub views, UIBBs and all. Main view represents the tab, sub
view represents the sub tab, and UIBB represents the window of WD component. We
will add one more main view to it (because we have 2 windows in our WD
component) and one sub view will come automatically to it.

If you click on main view and sub view, you
can see there are options to change the name, index and all. There will also be
the delete button to delete that element.
So we will give the component name and view
name like below.


Click on Save.
Now as we are done with the creation of
application and component configuration, we can see two new options for the
same would be coming in SE80 in left side panel.

Right click on application configuration and do test.
Below screen will get open in browser.

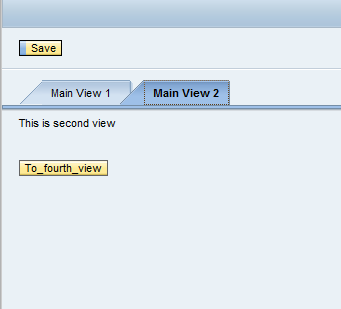
You can navigate to the other views and can come
back. Go to the second tab and you will see another view there and can navigate
further.


No comments:
Post a Comment