Background: While working on
one or other Webdynpro component, we all have come across the implementation of
ALV. Interactive ALV is the type of ALV where after giving the input, user is
first shown the primary list of ALV. A secondary list will be displayed on the
click by user in one of the records of primary ALV. This secondary list will
have more elaborated data of the selected record.
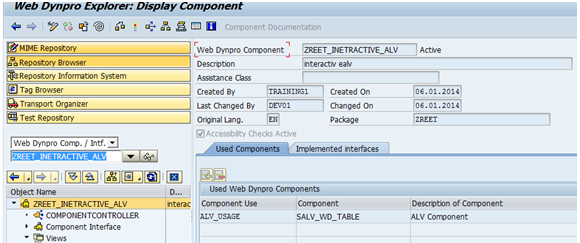
For implementation of ALV in ABAP Webdynpro, we have to create the
component usage of one standard Webdynpro component named SALV_WD_TABLE.
Further we have to do the external mapping of DATA node of SALV_WD_TABLE to our
context node which is going to have the final value for display in ALV. We also
have to embed the TABLE view of SALV_WD_TABLE into our ViewContainerUIElement
of the respective view of our custom component, where we want to display the
ALV.
While working on one such ALV
requirement, I came across one scenario where I need to implement the
interactive ALV. As per the requirement both the ALVs must be displayed on the
same screen (View).
The usual approach to achieve
this is to create as many separated usage of SALV_WD_TABLE as the number of
ALVs you want to implement. In my case I could have to create 2 usages. The other
approach is to implement the component usage dynamically. This approach can
particularly be proved helpful when at design time you are not sure how many of
component usage you need to create.
So the component usage which we
create at design time is called the static
component usage, while the one created through program s called the dynamically created component usage
Instead of following the static
approach all the way, I created one component usage statically while other one
I created through program (dynamic creation of component usage).
Pre-requisite: Must have
worked on normal Webdynpro application. Knowledge on static creation of
component usage in own custom Webdynpro component.
Creation of Static Component Usage:
1. Create one Webdynpro component with main view and a window.
2. Now go to the webdynpro component -> Used component tab and create a static component usage of SALV_WD_TABLE.
3. Now go to component controller and create a new controller usage.

4. Now in context tab of component controller create 3 new node named sales_doc,
sales_header_data, sales_item_data with the below mentioned attribute and properties.


5. Go to Component Usage sub tree which is coming in left side panel and there click on INTERFACECONTROLLER_USAGE. There do the external binding of Sales_header_data context node to the DATA context node of SALV_WD_TABLE.

6. Now got to the window and there by right clicking on
the ViewContainerUIElement Header_alv click on Embed_view and there choose
the table view of SALV_WD_TABLE.

7. Now in layout tab of main view create appropriate UI
element as shown in below screen shot.

In the Input
element we will be giving the VBELN as input and on clicking of button Show
primary ALV will be displayed on ViewContainerUIElemenrt HEADER_ALV.
On the onAction
property of button ‘Show’ we have created an action named SHOW and a
corresponding method names ONACTIONSHOW
has been created automatically.

8. Go to the context tab of the view main and drag and
drop the context node of component controller to the view’s context.

9. In attribute tab add one attribute as follows.

10. Now go to the method ONACTIONSHOW and write the
below logic for fetching the data to be displayed.


11. By doing this till here your primary screen will be
coming happily on clicking of ‘Show’ button. Create a webdynpro
application and test it. It will look like below

Creation of Dynamic Component Usage:
12. Now if we want to click on one row of ALV and want
the secondary list to be displayed we have to use the Hotspot technique of
ALV. Hotspot technique is about creating one column in ALV as hotspot. By
clicking on that column’s value ONCLICK event of ALV will be triggered and
further defined code will trigger.
13. In order to
define the hotspot in our ALV, we need to do further coding in ONACTIONSHOW
method itself. Below is the screen shot of code which is pretty self explanatory


14. Now in Method list create a new event handler method
and in even column pick ON_CLICK event of the interface controller of the
component usage ALV_USAGE.
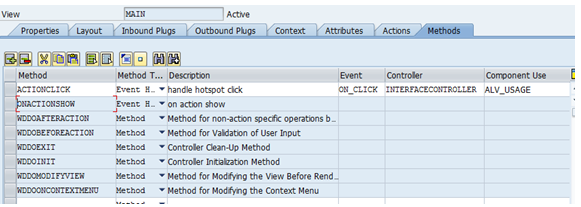
15. This method will automatically have one importing
reference parameter named R_PARAM. This variable’s Value field will have
the value of the clicked column of ALV list.

16. In this method we will first write the logic for fetching
the data for secondary list for clicked value of primary list.


17. Below is the screen shot of the code which is meant
for creating the component usage dynamically. For that we have first
created a component usage group and then created a component usage. The
code in screen shot is self explanatory. I have put a lot of comment there
to make everything clear. And yes…put this code in ACTIONCLICK method
itself.


18. Now test your application again. This time click on
the Sales Doc. column’s value of primary list to get the secondary list.
The result is like below.

By: Reetika Patel


