Tuesday, 12 August 2014

Creation of PDF from Standard text

Requirement: User wants a certain text to be send in mail as PDF attachment.

Solution: We create a SO10 standard text for that text. Further we can have 2 approaches.

            First approach: Embed that standard text in a window of a new script. Call that script in a usual manner using OPEN_FORM, WRITE_FORM, CLOSE_FORM function module. In the calling of CLOSE_FORM we will get the OTF format of that script in suitable type of internal table. Convert that OTF format into PDF format internal table and use that as an attachment in mailing functionality.
            Second approach: Our aim is to have the final text in PDF format in suitable in internal table so that we can use in attachment in mail. This we achieved through usual script manner in the previous approach. Now we will use another way. 
 
There are 2 facts that we will use in this second approach. First is whenever we write something on screen, a spool automatically get's created for that. We can see that spool no using the system variable SY-SPONO. Another is that we have Function module to convert any ABAP spool into PDF. So we will see how that works.

First we will read that text using READ_TEXT function module and get the text content in one internal table of type TLINE. Further we will use function module GET_PRINT_PARAMETERS following a loop on internal table and in each iteration print it's TDLINE column on screen. This will create a spool whose number we can have in system variable SY-SPONO. Further export that spool no using EXPORT TO DATABASE INDX. EXPORT TO MEMORY ID won't work here because we are going to call this program in background from the next program we will create.

Create another program. Here we will be creating a job in background. In that background job we will insert a process by submitting our earlier created program and finally we will close that  background job. Further we will use function module named 'CONVERT_ABAPSPOOLJOB_2_PDF' to convert the spool number, which we will be importing(which we have exported in our earlier program) in this program, into PDF format.
Below is the code snapshot.

REPORT 1:


REPORT 2:


Test  this report by executing it and checking the newly created entry in SOST.

                                                                                                             By: Reetika Patel

Wednesday, 23 July 2014

Printing a window in SAPSCRIPT without even calling it in driver program

Friends, lately 2-3 times I came across the situations where one window of script was coming into picture in print preview and while debugging also I could see it getting triggered. Tried putting break -point for every call of WRITE_FORM in order to find out from where exactly these windows are being called but to no avail.

On my recent encounter to this strange issue, I decided to go up to the bottom of the issue. Did a close analysis of the windows which were explicitly being called in driver program and those which were not. One thing was common among the windows, which were not being called in driver program, which was that there were no element in those windows. I google for it and Yes it was right.

So conclusion is, “We don't have to use WRITE_FORM explicitly for the windows which are having no element in it. We can go without caring for the calling of such windows. SAP standard code handles it automatically”.

Here I have developed one demo script and driver program to demonstrate it.
  1. Create a new script.
  2. Create 2 windows in it named Header and Main window.


  3. In the Header window, go inside and right something without using an element.


  4. Go inside the main window and write something under an element.


  1. Save and activate it.
  2. Create a diver program for this script and do the coding like below.


  3. Save it and activate it. Run it and choose output device as LOCL. Do the print preview

    Result:


  4. We are getting the content of Header window, while we have not used the WRITE_FORM for it.


                                                                                                                 By: Reetika Patel

Friday, 18 July 2014

Using checkbox in ALV Webdynpro with Messaging functionality

Requirement: Creation of ALV with Check box and messaging functionality

Prerequisite: Creation of simple Webdynpro ALV application.

Steps:

1. Create a webdynpro component.
2. In main screen in 'used component' tab create the component usage of the standard ALV component SALV_WD_TABLE.


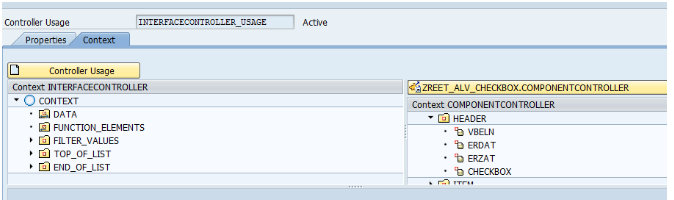
3. Go to component controller and create the component usage here also by clicking on the button as below. It will show the component usage you have created earlier. Use this one and screen will look like the 2nd screen shot.


4. Go to context tab of component controller and create 3 nodes named Header, Item, select_option. Make their attribute as mentioned below.


As you can see in right hand side panel, there is the context of component SALV_WD_TABLE. If you check in that component, the context shown here in right hand side, are actually the interface nodes of SALV_WD_TABLE. This way interface node come to the custom component where they are used.

5. Create a structure named ZHEADER1 in SE11 like below. And create a table type Z_HEADER
where line type is ZHEADER1.


These structure and table type we are going to sue further in our coding.

6. Create 2 attributes in attribute tab of component controller like below.


7. Create the layout of main view like below.


8. Go into the window where main view is embed. Inside main window you will get to see the view container you have created in main view's layout. Right click on it and click on 'embed view'. There select the 'Table' view of the used component. The window tab will kook like this now.


9. Go to INTERFACECONTROLLER in component usage. There bind the HEADER node of component controller to  DATA node of interface controller


10. In MAIN view on display button, create an event on action named 'ONDISPLAY'. By doing this there would be one method created automatically in method tab of the view like below.


11. Our job now is to fill the internal table and then the HEADER context node in order to display it in ALV. For that, in ONACTIONDISPLAY method we will right the below code.


12. Now go to the method tab of main view. There create one event handler method named ONCLICK. In event column select ON_CELL_ACTION event of interface controller of component usage ALV_USAGE.


13. Going inside the code of ONCLICK method, you will find one parameter named R_PARAM. This parameter will have the required info to process the checked row. This parameter will have data ranging from index of checked table record, column name, column value and all.

14.  We are implementing the functionality of displaying information message on check /uncheck of
check box and displaying the information message containing the index of table row. Below code is used for that. That is very well using the R_PARAM parameter of the method.


Results:


                                                                                                             By: Reetika Patel


Thursday, 10 July 2014

Display of traffic signal lights in ALV

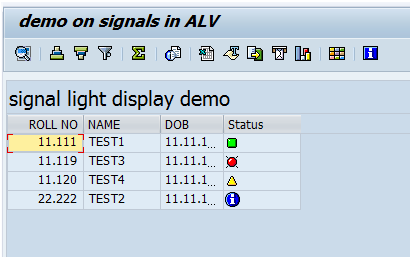
Some times we get requirement to show the lights in ALV display. Those lights one can compare with the traffic lights. In ALV, those lights show the particular state of that record. It can be used for anything like showing the material in stock, showing the criticality etc.

How to achieve it:
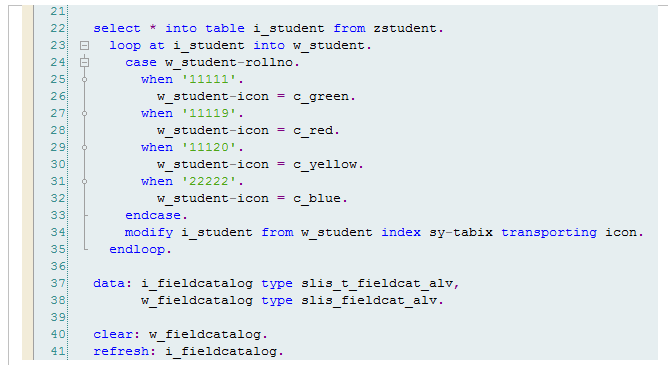
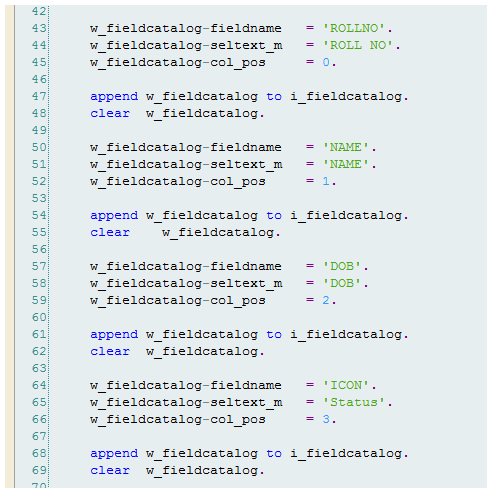
  1.  Declare a variable of type icon_d  in internal structure type. Our final internal table which we will display would be of that structure type.
  2. There are some IDs which actually let us show those lights. The full information for those can be find in the below link.
    http://www.sapdesignguild.org/resources/icons_sap/status_icons.htm
  3. we will assign those Ids to out internal table's icon field.

Code:


Result:


                                                                                                             By: Reetika Patel

Thursday, 5 June 2014

Dynamic creation of component usage


Background: While working on one or other Webdynpro component, we all have come across the implementation of ALV. Interactive ALV is the type of ALV where after giving the input, user is first shown the primary list of ALV. A secondary list will be displayed on the click by user in one of the records of primary ALV. This secondary list will have more elaborated data of the selected record. 

For implementation of ALV in  ABAP Webdynpro, we have to create the component usage of one standard Webdynpro component named SALV_WD_TABLE. Further we have to do the external mapping of DATA node of SALV_WD_TABLE to our context node which is going to have the final value for display in ALV. We also have to embed the TABLE view of SALV_WD_TABLE into our ViewContainerUIElement of the respective view of our custom component, where we want to display the ALV. 

While working on one such ALV requirement, I came across one scenario where I need to implement the interactive ALV. As per the requirement both the ALVs must be displayed on the same screen (View).  

The usual approach to achieve this is to create as many separated usage of SALV_WD_TABLE as the number of ALVs you want to implement. In my case I could have to create 2 usages. The other approach is to implement the component usage dynamically. This approach can particularly be proved helpful when at design time you are not sure how many of component usage you need to create. 

So the component usage which we create at design time is called the static component usage, while the one created through program s called the dynamically created component usage 

Instead of following the static approach all the way, I created one component usage statically while other one I created through program (dynamic creation of component usage). 

Pre-requisite: Must have worked on normal Webdynpro application. Knowledge on static creation of component usage in own custom Webdynpro component.
Creation of Static Component Usage:
1. Create one Webdynpro component with main view and a window.
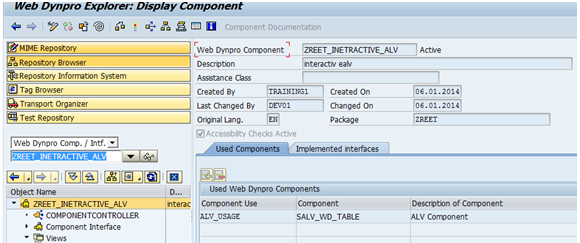
2. Now go to the webdynpro component -> Used component tab and create a static component usage of SALV_WD_TABLE.
3. Now go to component controller and create a new controller usage.
4. Now in context tab of component controller create 3 new node named sales_doc,    
    sales_header_data, sales_item_data with the below mentioned attribute and properties.


5. Go to Component Usage sub tree which is coming in left side panel and there click on INTERFACECONTROLLER_USAGE. There do the external binding of Sales_header_data context node to the DATA context node of SALV_WD_TABLE.
6. Now got to the window and there by right clicking on the ViewContainerUIElement Header_alv click on Embed_view and there choose the table view of SALV_WD_TABLE.
7. Now in layout tab of main view create appropriate UI element as shown in below screen shot. 
In the Input element we will be giving the VBELN as input and on clicking of button Show primary ALV will be displayed on ViewContainerUIElemenrt HEADER_ALV. 
On the onAction property of button ‘Show’ we have created an action named SHOW and a corresponding method names ONACTIONSHOW has been created automatically.
8. Go to the context tab of the view main and drag and drop the context node of component controller to the view’s context.
9. In attribute tab add one attribute as follows.
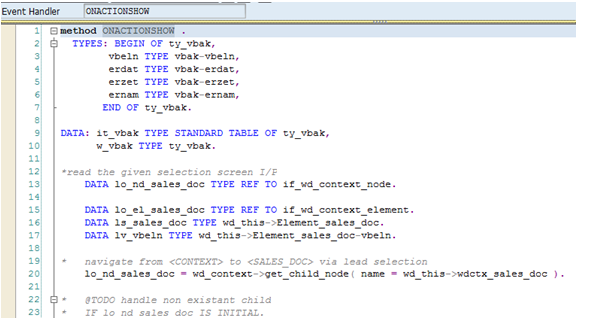
10. Now go to the method ONACTIONSHOW and write the below logic for fetching the data to be displayed.


11. By doing this till here your primary screen will be coming happily on clicking of ‘Show’ button. Create a webdynpro application and test it. It will look like below


Creation of Dynamic Component Usage:
12. Now if we want to click on one row of ALV and want the secondary list to be displayed we have to use the Hotspot technique of ALV. Hotspot technique is about creating one column in ALV as hotspot. By clicking on that column’s value ONCLICK event of ALV will be triggered and further defined code will trigger.
13. In order to define the hotspot in our ALV, we need to do further coding in ONACTIONSHOW method itself. Below is the screen shot of code which is pretty self explanatory

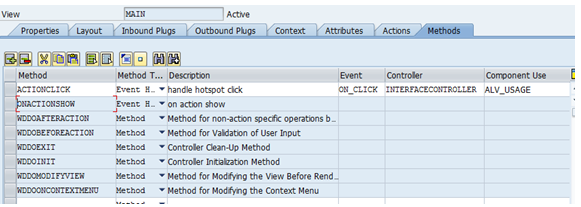
14. Now in Method list create a new event handler method and in even column pick ON_CLICK event of the interface controller of the component usage ALV_USAGE.
15. This method will automatically have one importing reference parameter named R_PARAM. This variable’s Value field will have the value of the clicked column of ALV list.
16. In this method we will first write the logic for fetching the data for secondary list for clicked value of primary list.

17. Below is the screen shot of the code which is meant for creating the component usage dynamically. For that we have first created a component usage group and then created a component usage. The code in screen shot is self explanatory. I have put a lot of comment there to make everything clear. And yes…put this code in ACTIONCLICK method itself.


18. Now test your application again. This time click on the Sales Doc. column’s value of primary list to get the secondary list. The result is like below.

                                                                                                              By: Reetika Patel