Showing posts with label Floor Plan Manager. Show all posts

Friday, 12 February 2016

Basics of ABAP Webdynpro: Getting familiar with Webdynpro jargons part 3

Internal/Context mapping: We can define context node at any of the available controller. However as WD component controller works as a global one, context node defined there is accessible in any other controller. We just have to drag and drop those WD component controller context node to the controller we want them to be used. In that case, if we define any value to this node at WD component level, this value will flow to the other controller where it has been used. And also if we make any changes in that context node in controller where it is mapped, that value will flow to WD component level also.

External/Cross component context mapping: In one of the earlier posts we have seen what component usage is all about. Suppose we are using WDC1 into WDC2 through component usage. Now context mapping between a context node, which is in interface controller of WDC1, and a context node of WDC2 will be known as external mapping. In that case context node data from WDC2 will flow to WDC1.

Hook methods: As soon as you create a WD component, many hook methods will be automatically will be available at WD component level, view level, Window Level. In one of my post, I have very elaborately described about the Hook methods and their order of triggering in normal as well as in special scenarios. To know more ClickHere and Here

Singleton Node: We will understand this with one example. Suppose there is one node which will have sales order header related information. Now this node has another sub/child node which is meant for the item level information. In normal scenario if both of these nodes are normal node, if the parent node has 10 header records, child node will have the item level information of all the 10 sales order.

Now in case the child node is defined as singleton node, this child node will only contain item level information for the sales order which is currently selected. This is huge success in improving the overall application performance.

Supply function: While defining the context node we can give the supply function also. This supply function is meant for providing a value to the context node. Supply function will gets triggered if the data of the context node is being used and its value is either initial or invalid. Context node’s value will be invalid if it’s a singleton node and the lead selection of the parent node has changed. In that case supply function will get triggered and will calculate the new value based on the parent node’s data.

Apart from the ABAP Webdynpro terms I covered in last 3 posts, I have already shared many ABAP Webdynpro related posts in my blogs. While you can go through the blog to find more, here are few links of the important posts.

Deploy ABAPWebdynpro application in SAP Enterprise portal 

Default leadselection in ALV in ABAP webdynpro

Disable empty rowscoming in Webdynpro ALV

Dump (System_name :is not a valid attribute type) in starting the Webdynpro Application 

Radio button as a cell editor for a column in Table UI element - Part 1 

Radio button as acell editor for a column in Table UI element - Part 2 

Different types ofwindow creation in Webdynpro

Cell Variant: A wayto use multiple editor in a single table column in webdynpro ALV 

Floor Plan Manager:FPM application using OIF


Use ofIF_FPM_UI_BUILDING_BLOCK interface in FPM and triggering sequence of itsmethods 


I’ll continue posting more basic concepts and exercises in my further post. Till then Happy Learning :)

Saturday, 5 December 2015

Floor Plan Manager: FPM application using OIF

Prerequisite: Basic understating of ABAP Webdynpro component, views, windows.

If you have the basic understanding of ABAP WD and have created few WD applications on your own, I am sure Floor plan manager (FPM) would be in your next hit list. So I’ll start with what is FPM, what it’s use is, what are the different options available under FPM and then at last we will create one application using one of those options.
In simple words FPM is a kind of wrapper we use above our WD application so that the application look uniform in UI and bear a consistency throughout the application.  FPM can be of different types. Below are listed available types.

Object Instance Floorplan (OIF): Standard component is FPM_OIF_COMPONENT
Overview Page Floorplan (OVP): Standard component is FPM_OVP_COMPONENT 
Guided Activity Floorplan (GAF): Standard component is FPM_GAF_COMPONENT
Quick Activity Floorplan (QAF): This is kind of subset of OIF so standard component will be same

Below mentioned are the rough steps which we follow while creating the FPM application.
  1. Till creation of WD component our work will remain same. The only difference is at component level, we have to implement the WD component interface named IF_FPM_UI_BUILDING_BLOCK.
  2. After that while creating the application we give the respective standard component’s name in component field and corresponding interface view and plug name also.
  3.  We create configuration of the WD application, which will lead us to a web page of Webdynpro ABAP Application Configuration. At this point of time it’s very crucial to understand the concept of Application Configuration and Component Configuration. As the name suggests application configuration is meant for WD application and component configuration is meant for WD component. What is the basic difference between these two, we will cover in a later post. As of now we have to create an application configuration for the WD application. We have to give a configuration id for this application configuration. Once we create this configuration id we will see a screen which tells us about the component which we have given while creating the WD application. And now for this component we have to create a component configuration, where we can give the different view of different WD component we would like to have in different tabs. It may sound all clutter up, but have patience. It’s just a matter of doing a practical.
So we will create one WD application with 4 views, 2 windows where each window will host the 2 view out of 4 and we will create plugs so that we can come back and forth with a window’s view. Now we will make a FPM application. For simplicity, we will only have one text displayed in each view.  In Implemented Interface tab we will re-implement the component named IF_FPM_UI_BUILDING_BLOCK.


Create a WD application. As soon as window for application comes, it automatically has the component name for which we are creating the application in component field. We have to remove it and give entries like in screen shot.


Go to the application, right click on it and choose the below path.
 

A web page will get opened like below and it will have the application name. Beside is the field where we have to give the application configuration id. You can see this page is meant for application configuration. If we create component configuration the title of the page will read component configuration instead of application configuration. Give the name for configuration id.
  
 Click on create.

Once you click OK below screen will come. First column will tell us the WD application name. Second column will give us the name of the component which we have given in component field while creating the application. Had we not changed it to FPM_OIF_COMPONENT, it would have come as our component name. The last column is blank which is where we have to put the Component configuration name, and guess what. This component configuration would be for which component. This would not be for our component but for FPM_OIF_COMPONENT. So we will give a name there.

And as soon as we will save it “Go To Component Configuration” button will get active.

A warning is coming. Let it come, we care only about errors :). So click on newly activated button.  IT will take you to the Component configuration screen, and you can clearly see for which component we are creating the configuration. Click on create.


Once you click on OK, below screen will come which will actually be the layout when will test our application. So we have to now design this screen as per our requirement.
  
One main view and inside that one sub view comes by default. Inside that sub view one UIBB will come, which will actually host the windows of the component. We can see that when we click on UIBB, we get fields to gibve the name of the component and the view name. This view here in UIBB is actually the window in WD component. If you give the component name and do F4 in view field, you will get all the windows which are there in WD component.  In right side you have buttons to add many more main views, sub views, UIBBs and all. Main view represents the tab, sub view represents the sub tab, and UIBB represents the window of WD component. We will add one more main view to it (because we have 2 windows in our WD component) and one sub view will come automatically to it.

If you click on main view and sub view, you can see there are options to change the name, index and all. There will also be the delete button to delete that element.
So we will give the component name and view name like below.
 

Click on Save.

Now as we are done with the creation of application and component configuration, we can see two new options for the same would be coming in SE80 in left side panel.


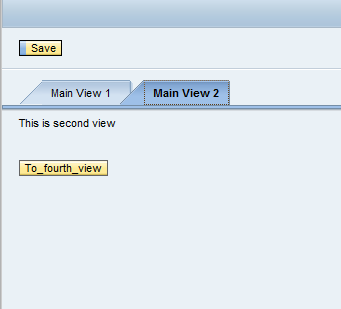
Right click on application configuration and do test. Below screen will get open in browser.


You can navigate to the other views and can come back. Go to the second tab and you will see another view there and can navigate further.


Happy Learning :)