Showing posts with label Hook Method. Show all posts

Friday, 12 February 2016

Basics of ABAP Webdynpro: Getting familiar with Webdynpro jargons part 3

Internal/Context mapping: We can define context node at any of the available controller. However as WD component controller works as a global one, context node defined there is accessible in any other controller. We just have to drag and drop those WD component controller context node to the controller we want them to be used. In that case, if we define any value to this node at WD component level, this value will flow to the other controller where it has been used. And also if we make any changes in that context node in controller where it is mapped, that value will flow to WD component level also.

External/Cross component context mapping: In one of the earlier posts we have seen what component usage is all about. Suppose we are using WDC1 into WDC2 through component usage. Now context mapping between a context node, which is in interface controller of WDC1, and a context node of WDC2 will be known as external mapping. In that case context node data from WDC2 will flow to WDC1.

Hook methods: As soon as you create a WD component, many hook methods will be automatically will be available at WD component level, view level, Window Level. In one of my post, I have very elaborately described about the Hook methods and their order of triggering in normal as well as in special scenarios. To know more ClickHere and Here

Singleton Node: We will understand this with one example. Suppose there is one node which will have sales order header related information. Now this node has another sub/child node which is meant for the item level information. In normal scenario if both of these nodes are normal node, if the parent node has 10 header records, child node will have the item level information of all the 10 sales order.

Now in case the child node is defined as singleton node, this child node will only contain item level information for the sales order which is currently selected. This is huge success in improving the overall application performance.

Supply function: While defining the context node we can give the supply function also. This supply function is meant for providing a value to the context node. Supply function will gets triggered if the data of the context node is being used and its value is either initial or invalid. Context node’s value will be invalid if it’s a singleton node and the lead selection of the parent node has changed. In that case supply function will get triggered and will calculate the new value based on the parent node’s data.

Apart from the ABAP Webdynpro terms I covered in last 3 posts, I have already shared many ABAP Webdynpro related posts in my blogs. While you can go through the blog to find more, here are few links of the important posts.

Deploy ABAPWebdynpro application in SAP Enterprise portal 

Default leadselection in ALV in ABAP webdynpro

Disable empty rowscoming in Webdynpro ALV

Dump (System_name :is not a valid attribute type) in starting the Webdynpro Application 

Radio button as a cell editor for a column in Table UI element - Part 1 

Radio button as acell editor for a column in Table UI element - Part 2 

Different types ofwindow creation in Webdynpro

Cell Variant: A wayto use multiple editor in a single table column in webdynpro ALV 

Floor Plan Manager:FPM application using OIF


Use ofIF_FPM_UI_BUILDING_BLOCK interface in FPM and triggering sequence of itsmethods 


I’ll continue posting more basic concepts and exercises in my further post. Till then Happy Learning :)

Wednesday, 26 August 2015

Triggering of Hook methods in special cases in Webdynpro

Pre-requisite: You must be comfertable with the concept and working of hook methods. If not Click Here.

So now as hook methods are no more an alien term to you, we will see the triggering of hook methods in few special cases.

Case 1: When user click on some button, but after action control remains on the same screen.

                        WDDOBEFOREACTION
                        ONACTION<Action_name>

                        WDDOAFTERACTION
                        WDDOBEFORENAVIGATION (COMPONENTCONTROLLER)
                        WDDOMODIFYVIEW
                        WDDOPOSTPROCESSING (COMPONENTCONTROLLER)

Case 2: When user click on some button and a next view gets open.

                        WDDOBEFOREACTION (of first view)
                        ONACTION<Action_name>
                        WDDOAFTERACTION (of first view)
                        WDDOBEFORENAVIGATION (COMPONENTCONTROLLER)
                        WDDOINIT (of next view, because that view is being loaded
                                                  for the first time)
                        WDDOMODIFYVIEW (of next view)
                        WDDOPOSTPROCESSING (COMPONENTCONTROLLER)
Case 3: When user click on some button and a popup gets open as a result.
                        WDDOBEFOREACTION (of first view)
                        ONACTION<Action_name>
                        WDDOAFTERACTION (of first view)
                        WDDOBEFORENAVIGATION (COMPONENTCONTROLLER)
                        WDDOMODIFYVIEW (of first view)
                        WDDOPOSTPROCESSING (COMPONENTCONTROLLER)
                        WDDOINIT (of popup view)
                        WDDOBEFORENAVIGATION (COMPONENTCONTROLLER)
                        WDDOMODIFYVIEW (of first view)
                        WDDOMODIFYVIEW (of popup view)
                        WDDOPOSTPROCESSING (COMPONENTCONTROLLER)

Case 4: When user clicks on OK button of popup screen. On click of this button popup screen will disappear and control will come to the main screen. This OK button’s action will be handled in main screen. So in this scenario.
                        WDDOBEFOREACTION (of first view)
                        WDDOBEFOREACTION (of popup view)
                        ONACTIONOK (action method of OK button, which is in first view)
                        WDDOAFTERACTION (of first view)
                        WDDOAFTERACTION (of popup view)
                        WDDOBEFORENAVIGATION (COMPONENTCONTROLLER)
                        WDDOMODIFYVIEW (of first view)
                        WDDOMODIFYVIEW (of popup view)
                        WDDOPOSTPROCESSING (COMPONENTCONTROLLER)
                        WDDOEXIT (of popup view)
                        WDDOBEFORENAVIGATION (COMPONENTCONTROLLER)
                        WDDOMODIFYVIEW (of first view) : This is again coming into picture
                                  because after popup view finally control is going into main view.
                        WDDOPOSTPROCESSING (COMPONENTCONTROLLER)

Happy Learning  :)

Tuesday, 25 August 2015

Hook methods: execution and usage in Webdynpro

In simple words, Hook methods in Webdynpro are special methods that come automatically once you create a component, window, view. Also hook methods will come into picture at different point of time during execution of webdynpro component.

How we can differentiate hook methods from normal user defined methods?
    By looking at the method's name. All the hook methods start with 'WDDO'

What all hook methods are available to us?
     Hook methods are specific to component, window and view. One can easily find out by going into 'Methods' tab in respective part. For your easy access, below is the information.

What is the use of Hook methods?
That is Good question, but before that we should be aware of which hook method comes into picture at what time and in which order.

One can easily figure out that by putting break points in all hook methods and test the webdynpro application. Control will stop at different break points and we can find out the exact order of execution of different hook methods. BUT :) for your easy reference, below is the information.

WDDOINIT (COMPONENTCONTROLLER): will be called only once when component is loaded
WDDOINIT (Window): will be called once each time when window is getting loaded.
WDDOBEFORENAVIGATION (COMPONENTCONTROLLER): Every time before WDDOMODIFY or WDDIINIT of a view is called
WDDOINIT (view): will be called only once each time view is gettinig loaded.
WDDOMODIFYVIEW (View): will be called every time either view is getting loaded for first time
or user does some action or you are coming back to view from some other view.
WDDOPOSTPROCESSING (COMPONENTCONTROLLER): Every time after WDDOMODIFY or WDDIINIT of a view is called.

After this you will be able to see the first view of your WD application. Other hook methods will come into existence upon some user action. If you try to close the WD application, below hook methods will be called.

WDDOEXIT (View)
WDDOEXIT (COMPONENTCONTROLLER)


So coming back to the question on the usage of hook methods, now we can quickly understand it.

We can make use of WDDOINIT for initialisation sort of work and WDDOEXIT for clearing the variables.

WDDOMODIFY is highly recommendable for making changes in the view before it is displayed . If we are trying to do some dynamic changes to the view, this is the place. Also WDDOMODIFY method has a parameter named VIEW in it which holds the reference if the current view, so we can use this parameter while doing dynamic changes to the view.

Happy Learning :) 

Thursday, 23 July 2015

Different types of window creation in Webdynpro - Part1

We can create windows in dynpro component and can use them in many different ways. This post will have number of parts and each part will be dedicated for one type of window creation.

So here we go with the first type.

Creation of external window: This type of window creation will be done when we want to open another webdynpro  application in next tab.

As the name suggests itself, this would be an external window. On some event in one window, another window will be created but that 2nd window will get open in a different tab. So our first window and second window exists side by side.

Below are the major steps which we will follow.
  1. Create one webdynpro component which will have one button on the view.
  2. Create another webdynpro component which also can have anything on the screen. For ease, I am only displaying one text message here. Create application for this component.
  3. Now in the first componet, do the below coding in onAction event of button.
  •  Get the URL of the 2nd webdynpro application which we have crated in 2nd point. Do this by using method CONSTRUCT_WD_URL of class CONSTRUCT_WD_URL.

  • Use CREATE_EXTERNAL_WINDOW method of interface if_wd_window_manager for creation of external window.
Create application for first component and test it.

Now clock the button next. A new tab will get open with the window of 2nd WD component.

 Happy Learning :)

Saturday, 18 July 2015

Radio button as a cell editor for a column in Table UI element - Part 2

 We have seen creation of radio button in a table column. In case you have missed the part 1 of this tutorial here it is Part 1.

This post is all about how to save that radio buttons data in database table so that next time when one comes back to the application, previously selected radio buttons come selected for the user. Much in tune with the checkboxes thing. Though in general, we use radio button to select one option out of available ones, so in that case there is no need to save that data in database table, but still there are many scenarios where one would like to save the data for further use in some other component.

The idea would be to fill the value of the attribute, which is bind to the selectedKey poperty, in a way that it always holds one single value for the row whose radio button is selected. This coding we will do in the method which we have given for onSelect property of radio button.

So we will take base of the component which we have created in part 1 and we will add one button. On click of that, data will be saved in a database table. Next time when we will open the application, we will get the earlier saved data.

So in main view add one button and assign one method for onAction event.


Create one database table with below fields.

Add below logic in method for onAction event.

Paste below code in WDDOINIT method of the view.


Now go into the properties of radio button and for event onSelect create one mthod TOGGLE_RADIO_BTN. In that method add below lines of code.


Now test the application and also check the content of the database table. You will get the fair idea of the working of the radio buttons.


Happy Learning :)


Wednesday, 1 July 2015

Radio button as a cell editor for a column in Table UI element - Part 1

Having radio button as cell editor of column in Table is more than just binding cell editor as is the case with any other cell editor.

First of all there would be no "RadioButtonGroupByIndex" and "RadioButtonGroupByKey". There would be just "RadioButton" when you will try using radio button as a column. So the question arises here, how we are going to bind radio button in a group so that they behave like in a set and we can select any one of them. Further how we can create more such groups. Two fields in the properties of radio button, hold the answers.

KeyToSelect: It's value varies for every radio button which falles in same group.

SelectedKey: It's value remains same for radio button of a single group. And (most important) is equal to KeyToSelect property of the selected radio button of the group. So, if we allow ourselves to think other way around, how we are gonna decide which row will have radio button selected? By comparing these 2 fields of a row. Simple :)

So in another way, this field is responsible for creating different groups of radio buttons and we can select one radio button per group. I hope I am sounding simple and clear :)

Let's see an exemplary data in a table.


Let's try with some practical stuff..

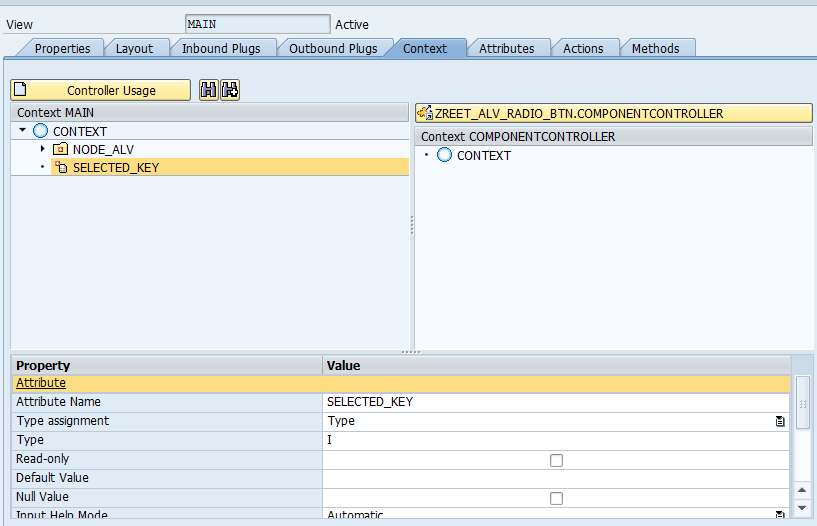
Create one attribute directly under context node and one node with below attribute.

Radio_btn attribute would be of the same type ans selected_key. design layout for Table and bind the properties of radio button like below.

SelectedKey property should be binded to the context attribute which is outside the node, which is bind to the table. This attribute will automatically take the value of Radio_btn attribute once we check the radio button.

In WDDOINIT method write some logic to fill the node which is bind to the table, so that initially some data will be displayed in screen.

Activate the component, make application and test it. Will come liek below screen shots.


Monday, 29 June 2015

Dump (System_name : is not a valid attribute type) in starting the Webdynpro Application

During one of the development, I did some changes and tried testing the application when it started givinig below dump. It was not even going into the first screen.

 ST22  was showing the issue in method _GET_ATTRIBUTE_RTTI of class CL_WDR_CONTEXT_NODE_INFO======CP. Putting break point there was of no help as it was in the middle of one standard code. Somethign was realted to a node's attribute but which node, which attribute and how come it was working till 2 minutes ago?

I quickly revised what exactly I have changed very recently. I was adding a couple of extra fields in a table, and after that it stopped working. I went into component and started checkiing each node throughly and there it was.

That table, where I was adding extra fields, is being used as dictionary structure in one of the node and that node's attribute was coming from that table only. I have not done the "Update Mapping" like below and that was the point.

Once I updated the mapping of that node, my application was running as usual.